Kit Guides
Avoiding Common Kit Mistakes
Kit Guide
The Rooster 8.1 Class - Tuning Guide
Tuning Guide
By Steve Cockerill
With the possibility of sailors well in excess of 90kg sailing the Rooster 8.1, we have built in a large amount of luff curve the sail to support the leach – even when the mast is bending sideways under the full hiking load of the sailor. This means that the rig has to be set up differently to the Laser® Standard Rig sail that perhaps you may be more used to. If you were to merely use the equivalent vang (kicker) tensions of Laser® Standard Rig sail you would immediately notice, on an off-wind leg, that the luff of the sail is over-full and the shape of the sail is not balanced. This guide has been written to help you get the most out of your Rooster 8.1 Rig.
Pre sailing tips
If you are using the glass fibre sleeve in conjunction with a Laser® Standard Rig lower mast you will need to pack out the inner sleeve with tape to ensure a good interference fit with the lower mast and to pack out the joint of the upper mast to ensure a good fit in the extender tube. If you don’t ensure a good interference fit for both you may find your leach tension reduced which will reduce your pointing ability.
Upwind 0-6 knots
Kicker tension should be block-to-block or more (the term block-to-block means sheet the mainsheet blocks together and pull the slack out of the kicker) You may have to use some Cunningham to help open the top of the sail (take a look at your tell tails) you may also find that with a new sail you have some luff curve creases that are there due to the luff curve of the sail not matching the oddities of different spar bends – with more use the sail cloth will get a little softer and accommodate these differences. Use of the Cunningham will also take these creases out. I flatten the Outhaul to reduce the drag and try to match the depth in the head of the sail. Perhaps only hand width depth in the bottom of the sail.
In the picture perhaps only 3-4 knots I have used lots of Vang to flatten the luff of the sail and used some Cunningham to unlock the upper leach and take out some luff to clew creases.
Upwind 7-12 knots
The Vang tension needs to be increased with wind strength however, depending on your weight, you may be able to sail with less Vang tension at some point in the increasing wind. Personally at around 77kg there is no point for me where I need more power as I am on the light side for the rig. Therefore I go from underpowered and using Vang to unlock the sail to overpowered and needing Vang to de-power the sail very quickly. Again I flatten the sail in the base as I am not looking for power from depth as there is plenty of sail area, so I tend again to leave the foot at about hand width.
The picture shows no vang tension in 8 knots.
Upwind 12-20 knots
Again for me I am seriously overpowered and use immense Cunningham tension to windward Speaking to the heavier sailors who are sailing the boat well, the same is true. They have commented to me that the sail still needs a little wearing-in to get the best out of it, but they think that it is because there is less resistance to the use of Cunningham. Again Vang is used heavily and as a light person, I think I use more than the heavier sailors, but I am lucky that I am also quite agile as the increased Vang tension makes it hard to get under the boom! Heavier sailors are inclined to use less vang to de-power which at the same time gives the sailors more room to cross the boat. I think if you are new to Laser® style sailing, you might find the amount of Vang tension impedes your movement around the boat. Laser® sailors are often aware of easing the vang tension to tack in strong breezes. Control the foot of the sail with Outhaul tension to keep it as flat as possible without restricting the use of the Cunningham. Always get the Cunningham on first and pull the Outhaul on afterwards.
Upwind above 20 knots
You are looking for a challenge! Play the sheet constantly! I am not sure that there is a survival technique to employ. In the Standard Rig Laser® you might release the vang tension completely in over 35 knots in order to make good to windward so maybe this is worth a try. I also suggest you don’t ease the Outhaul!
Update from Steve, February 2009: At the Nationals Last year on the windy second day I decided to use as much Cunningham as I could put on. I used the old style both legs pull with straight arms. I figured that either the sail would break – or I would be able to sail fast against Greg Carey who is a big unit. It worked!! No I mean I was very very competitive. The mast bent on its own – a bit like a windsurfer rig – and I sailed to windward with no kicker – but with the sail block to block. It was so easy! I beat Greg to the first mark and the rest is history.
Downwind 2-6 knots
As the introduction explains, we have a lot of fullness by the luff of the sail to distribute across the sail profile so use plenty of Vang tension. You will find that easing the Vang will not make the leach open any more or increase the flow over the sail, which is different to the Laser® Standard Rig in which you would ease the vang lots on a run. Use the red camber line to give you a clear indication of the fullness across the sail. In this picture I am able to run by the lee despite the lack of wind and with lots of vang, as the increased vang makes the flow attach to the sail. If you understand calibrations better, I use 75mm (approx 3″) more tension (measuring the 75mm as a distance the double block and becket on a 15:1 Vang has travelled away from the boom key block) than I would have used in similar conditions with a Laser® Standard Rig. I release the Cunningham and tend to keep the Outhaul quite tight, perhaps eased a little only as I tend to think of projected area rather than depth.
Downwind 7-12 knots
Not much change to the above. Perhaps you can ease the Outhaul and Vang a little on a deep reaching run as the fullness should move with the wind flow.
Downwind over 13 knots
Downwind 13 knots and above – hang on and enjoy the ride! The helm should be relatively easy as the rig is well over the bow reducing any weather helm but sit well back.
Reaching 4-8 knots
Your problem will be to unlock the upper leach. In this shot you can see that many of the boats still have plenty of Vang tension and no Cunningham tension
Reaching in Over 12 knots
You might want to hang onto the Cunningham as you go off wind to keep the fullness forward and avoid too much weather helm.
Laser® is a registered trademark owned by Velum Limited and currently licensed for use in Europe to Laser Performance (Europe) Limited. Rooster Sailing Limited is fully independent of both Laser Performance (Europe) Limited and Velum Limited.
Harmonised Rope Colours - Dream or Reality?
Standardisation of rope colours has been a hobby horse of mine for a very long time. I'm pretty sure it started when I used to swap boats with my mates to check out their rig or when stood on the shore, coaching. I would look down at perhaps 4 control lines and find that none were harmonised with the part of the boat they affected. Early on I standardised my control line colours and once I had the chance to influence what was available on the market, I made sure we offered Spectweleve™ Dyneema® and now Easysplice® for primary lines that matched my standard - Anything to help my tired brain when on the water!
My preference for the last 35 years:
Kicker or Vang: RED
Cunningham or downhaul: BLUE
Outhaul: GREY or BLACK
Spinnaker Halyard: FLURO YELLOW
For those of you with a traveller and inhaul control line, I'm yet to adopt a standard. So what are your preferences?Don't know which line to choose? Checkout our Blog and order online when you're sorted!
Protecting Your Assets - a Buyer's Guide for Spar and Foil Bags
Blog entry by Steve Cockerill
Putting your spars and foils into a cosy bag feels like the right thing to do. But if you are not careful, what appears to be a caring thing, might also be the worst thing. After sailing on salt water, we should wash our spars down with fresh water and where possible allow them to dry out. I tend to bag mine for safe keeping in transit. However, many bags use non-breathable fabrics and foams in their construction which trap any residual moisture. Moisture encourages dissimilar metal corrosion where stainless or Monel rivets react with the aluminium of the mast. The fizzing is proof of the corrosion taking place. What you need is a spar bag that breathes.Foils packed away in a non-breathable foil bag will sweat rather than dry out, causing Osmosis.
Ideally, you should dry off your foils before packing them away. Again salt water is a hindrance as it attracts moisture so a quick wash helps to remove the salt and gives it a chance to dry out. Look for foil bags that breathe.
What to Look For
Open cell foams with a breathable membrane is the safest option for both Spars and Foils. Spars and foils dry out naturally if they are packed damp which prevents dissimilar metal corrosion and osmosis. In my experience, many manufacturers are keen to save money on material cost which ends up costing you more in replacement spars and repairs to foils.
Below are some of the bags we make to protect your gear:
Padded Spar Bag 3650mm by 165mm (Laser Top Mast, Aero Top Mast and 9 Lower Mast, Lightening Upper and Lower mast)
Padded Spar Bag 2950mm by 165mm (Laser Boom and Standard Lower Master, Topper Upper, Lower Mast and Boom, Aero 7 Lower Mast, Aero Boom, Optimist Lower Mast and Lightening Boom)
Padded Spar Bag 2350mm by 165mm
Optimist Foil Bag
Foil Bag for the Laser/ILCA - also fits the Europe
4000 Rudder Bag
4000 Daggerboard Bag
Solo Rudder Bag
Solo Mast Bag
Europe Travel Mast Bag
Europe Boom Bag
Rooster® Duratex II™ - The Future of High Quality Neoprene Protection
Dinghy sailing can be super tough on your kit. Decks and cockpit floors that feature aggressive grip give the sailors security in the boat, whilst at the same time providing clothing manufacturers some interesting challenges.
Previous options tended to be to use harder wearing fabrics that offered less (or no) stretch, or compromise on the wear to allow freedom of movement.
The breakthrough came when we combined hard wearing polyester fibres with elastane to create Duratex II™. We have been integrating this across our product range over the last 12 months so you can feel both comfortable and unrestricted on the water whilst secure in the knowledge that your clothing is up for any challenge.All our current neoprene garments us Duratex II™, so when you decide to treat yourself, you know you are investing in the most durable and comfortable kit from Rooster®.
How to "End for End" a Top Mast
Bent top masts in the Laser®, now ILCA, are not fast - you loose leach tension which in turn effects your pointing ability.This video shows you how to check for a bent top mast, how to straighten it and then if you are convinced it is close to breaking, how to end for end it so you now have a new top mast. You will see from this video that I was pretty convinced that this top mast was ready for end for ending. The bend on it was quite extreme, which meant that I was going to have to stress the rivet hole to get the mast straight; they say aluminium only bends and straightens nine times before breaking and as this was also a second hand mast you never know when its going to fall over.Please forgive my lack of pillar drill, vice, etc. This is what I call boat park engineering. We hope you find the video informative!Products used: Stainless Steel Rivets
What have Molecular Forces got to do with Water Sports?
Have you ever wondered why water sticks to Spandex and not Polypropylene?
For the real techie explanation read on:
When an oxygen atom combines with two hydrogen atoms to produce a molecule of water (H20) it pinches the single electrons from each of the hydrogen atoms - a process called covalent bonding which is very strong. You could think of the oxygen atom as having 8 'electron' places set for dinner and there are 2 spaces free and the two hydrogen electrons are just desperate to join the party. Unfortunately the two single hydrogen nuclei are now left without an electron friend feeling a little unloved, grumpy and positively charged. This also sets up a dipole across the water molecule; the oxygen part of the molecule is negatively charged (as the electrons are around for tea) and the hydrogen part of the molecule is positively charged. The two grumpy hydrogen positively charged nuclei are always on the look out for any other attractive electrons to pout over even if they can't join up covalently (no tea party for them!)
This pouting style of bonding is called hydrogen bonding and is not as strong as covalent bonding (about a 10th of the strength of the covalent bond). When water comes across Lycra, those (positively charged) hydrogen atoms in the water find lots of 'loan pairs' of electrons to pout over - a sort of diet coke break moment. This is because Lycra is made of OH and NH groups which creates lots of loan pairs of electrons. Water's bond with Lycra's loan pairs is called hydrogen bonding and it makes the water stick to the fabric making it feel cooler, even more so, the wetter and windier it becomes. Similar hydrogen bonding occurs with many other materials such as nylon - typically used in spray tops etc.- which is why many spray tops can feel cold to the touch. However Polypropylene does not have any OH groups and hence no loan pairs of electrons and so it is not attractive to water - no pouting moments, making the garment feel dry and cosy even in the wettest conditions. Ideally worn next to the skin for a comfortable dry layer and developed by Rooster Sailing to provide you with a warm anti rash guard layer - ideal for a typical UK summer. We have made them into Long Sleeved tops, Leggings, Gloves, and Socks.
Oddly, I also found it ideal for sailing in Australia in their summer as it offered enough protection from the sun on lighter wind days whilst at the same time I did not get that horrible water shock when I got splashed. View the PolyPro range here.
RS Aero Over Deck Rigging
POST VIDEO NOTE: Please use a separate piece of short grey line in the Rooster kit to attach the two blocks to the traveller eye. see image below: This is to stop any chance of the two blocks and their 3mm elastic from tensioning the traveller in any way. This was required by measurement at the 2018 World Championships.
The story:
During the recent RS Aero World Championships, it became apparent that if I wanted to release the controls downwind efficiently that I would need to change the control lines to over deck take up style. The old style tended to get a little tangled downwind:
I was inspired by Steve Norbury's version that I had seen at the Aero Southern Championships which I knew was class legal. Obviously, I have put some of my splicing experience into the kit to fasten the two Ronstan Shock Blocks in place and used Rooster's EasySplice™ Continuous Control Line as it's just so easy! I used the Ronstan Shock Blocks as they can be colour co-ordinated and are very light - which I guess is nice as the boat is so nice and light. I also used Selden 30mm Loop Top Blocks for the take ups. They are also lighter and more than man enough for the job.
Rooster has produced a kit with most of the splicing done, all you will have to do is 'cow splice' the Ronstan Shock Blocks onto a pre-made double loop 180mm line under the deck. But if you are feeling brave, take a look at the related Rooster Videos on Splicing (Reverse Brummell Hitch, Spectwelve and Rooster EasySplice™ Continuous Control Line). We suggest you use 2mm Spectwelve (an SK78 12 braided Dynema) for the take-up tidies and Rooster 4mm Spectwelve (an SK78 12 braided Dynema) for the traveller. You will also notice that I have adopted the Rooster colours which have been used extensively in singlehanded sailing with blue for downhaul/ Cunningham, grey for outhaul and red for kicker or vang. Feel free to take the parts and ropes in the colours you are used to.
I used 5m of EasySplice™ for the outhaul system, although I did not have much line to spare so perhaps it's worth taking 6m and losing a bit. Our kit is now 5.5m so you will need to first ensure your outhaul is maximum off.
Then join the outhaul when it can just go in front of the centreboard case with a little movement.
For the downhaul, I used 8m of EasySplice™, plus 1m of 2mm Spectwelve for the two side deck tidy's and 1m of 4mm Spectwelve for the traveller.
Tools: I like my tools so I tend to try and use them all. But if you are keen to do the whole thing yourself then you will need:
Serrated Scissors
2/3mm Pull Fid
4mm Push fid
Rooster EasySplice™ Needle Fid (I use the super thin needle for the EasySplice™ Control Line splice).
Needles and Waxed Whipping Twine (available on the Rooster website to finish off the joins in the control line.)
If you purchase the kit, then you will only need the EasySplice™ Needle Fid, twine and needle, although I am sure you would still find the Serrated Scissors useful.
Splicing Tip When you cut the centre core out of easy splice, leave it as loose as possible. This will enable the other line to pass into it easier. Do not try and milk it to make it smaller as this will make it harder to pull the other end through it.
RS Sailing is the most forward-looking company I have ever been close to. I understand that they will be stocking these 'Rooster' upgrade kits in due course. I think it will make a significant difference to your Aero sailing enjoyment - if it could get any better!
Save Save
Aero Main Halyard Tips
Here is a neat little trick to make your Aero Halyard work a little more smoothly.
Take 1m of Rooster Easysplice and take 600mm of the inner core, but remember to tie a knot in the other end to ensure you keep the inner core where the rope stopper is. It will be hard to take out the 600mm - but give it your best shot. Then you can make a Brummel hitch loop in the easy splice (you will have to unknot the other end to pass it back through the tail. ). Examples of a Brummel hitch video can be found here. I folded the 600mm of uncored rope in half and made a 40mm long loop, ensuring the tail went back into the line over the maximum distance to fill the space that the inner core left. This gives the Easysplice the right thickness to jamb in your cleat. To ensure the boggle does not fall off the other end, you might like to back splice some of the EasySplice into the end (make it thicker). Check and adjust the length of your new EasySplice halyard to ensure the double thickness easy splice sits neatly on the cleat area. I keep using the stretchy 2mm polyester line as my pull up or uncleat line because its stretch allows the mast bend to vary lots with vang tension, ensuring that it will not pull the halyard out of the mast cleat. If you have lost the original - you can use this replacement (approx. 11m length is required) 2mm Polyester Halyard Line, sold per m.
Understanding Buoyancy Aids - Which Buoyancy Aid to Buy?
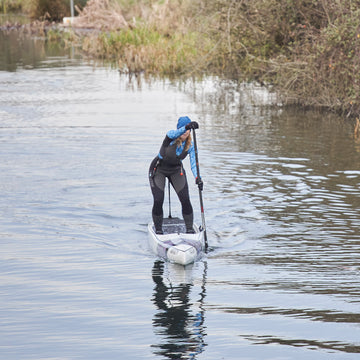
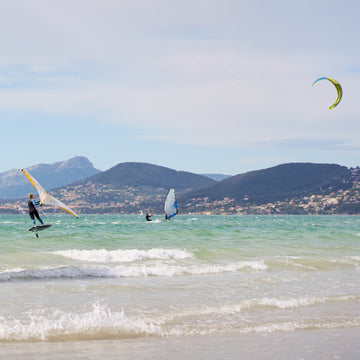
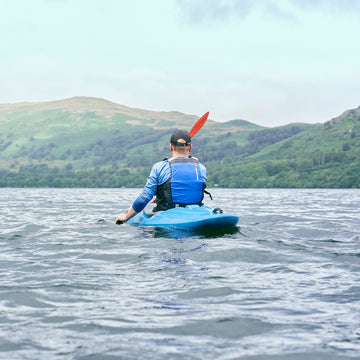
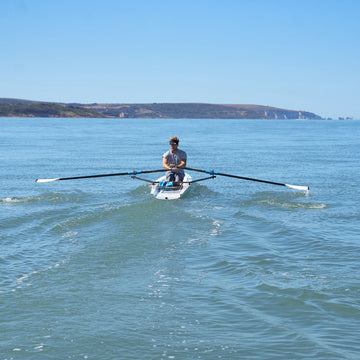
Rooster is one of the biggest Buoyancy Aid designers and manufacturers in Europe and has a vast amount of sailing experience within the team. You can be sure that once you have read this you will know what buoyancy aid will suit your requirements. If you are buying a buoyancy aid for the first or even the nth time, this article will help you work through the different versions, styles and specifications of those on the market. Our different buoyancy aids, often mistakingly called life jackets, have unique features that make them suitable for kayaking, SUP-ing, kite surfing, high-performance trapeze boat sailing, single-handed sailing, sports boat sailing and junior sailing. We tend to use the industry term PFD which stands for Personal Floatation Device. Which Buoyancy Aid is right for me? Our 50N overhead PFD took its inspiration from a kayak pattern and has been super popular with high-performance dinghy racers who want a clear view of their trapeze hook or who are looking for a PFD that gives them a good clearance with a low boom. Its high cut volume gives you extra manoeuvrability with your arms - so it is super comfortable sheeting or paddling. It also comes in a junior overhead PFD is the same volume as the small adult but has leg straps. As they grow, you can remove the leg straps and still have a functioning PFD as they grow. One possible drawback is as an overhead PFD, it can be slightly harder to put on for those with less flexibility. Every effort has been done to ensure that the foam has been shaped around your chest for comfort and that the adjustments have been covered by neoprene to reduce snagging, This can make it a little awkward to release the tensioning straps at the side (the ladder locks are hidden under the neoprene cover) but once you have felt the ladder lock under the neoprene with your thumb, you can release the tension from the outside of the neoprene. If you are looking for a junior PFD for your 8 year old - then the junior front zip makes it really easy to fit as your youngster only needs to stand in the loops when it is undone and you just zip them in. On the other end of the spectrum, we have our newest addition, the low profile 50N CE impact neoprene buoyancy aid, specifically developed to fit snugly in all the right places. Unique to Rooster, this CE12402-5 Approved certified buoyancy aid is an advance in our buoyancy aid range. I have been wearing the initial sample 50N CE impact PFD for a couple of years during its development. I wanted something that I did not know was on me and was as slim as it could be. We also wanted the smaller chest sized sailors had sizes that fitted snugly but also offered the required buoyancy for their weight. Used by high-performance dinghy racers wakeboarders, windsurfers and kitesurfers. You can tell how much we loved the final samples by our reaction in the office back in Autumn 2019.
EN ISO 12402-5 Side Zip PFD Our Side Zip Buoyancy Aidis a less sporty more general-purpose side zip option which is simpler and easier to put on and also uses the same softest foam for ultimate comfort we find in all our pfds. The foam does not have the internal shaping that we use on the Black Diamond Overhead PFD, but it is thinner which makes it more flexible. You do, however, have to remember to zip and clip once it is on before it will offer you the security you require.
You would have seen my Father wearing a side zip version when he was sailing his GP14 until he hung up his sailing boots 86 in 2015. All of our specifications have passed regulations for use in dinghy sailing and both conform to the 50N rule detailed in the rule book we all sail by. You may, however, notice that this 50N rule does not mean that every PFD has 50N of thrust - since smaller users would find too much buoyancy a hindrance - the 50N rule laid out in the specification details the required amount of lifting thrust required for the weight of sailor.
Still confused - give our technical or sales team a call on 01243 389997.
Tell Tales or Tails?
I am keen that you start telling tales that Rooster now has a Teflon® impregnated wool tell tails set that enables it to work in the wettest of conditions. The picture shows the red Teflon® coated tell tale verses the green untreated tell tails. Our tests have shown that the teflon impregnated tell tales take up to 90% less water than normal tell tails. This leaves them free to fly whatever the weather. If you are like me, then your tell tales are probably the most important sail setting device you will ever use. I recall seeing a fellow Finish sailor at a major European event sailing with over 250 sets of tell tails on his Europe sail. It resembled a hedgehog rather than a sail - but the different angles the tell tales took were fascinating - perhaps that's why he was so fast - we were more interested in his sail than our own!
Most fun I've Had with my Day Clothes On!
After recuperating from 3 months of illness, I am pretty frustrated at not yet being allowed on the water. My fevers have finally subsided, informatory markers have halved, haemoglobin is up and I am now doing some pretty limited training - like cutting the lawn; which incidentally nearly finished me off! At the weekend my birthday treat was to race my Father in Law and Step son in Model Laser's® on Emsworth Pond. The wind was a nice force 3-4 easterly - and these boats could move!
Armed with a Rooster Superlite Hybrid Jacket and a Tech Sweater sample, I wrapped up warm and had the time of my life. What was most amazing was that the Model Lasers® behaved exactly like real dinghies in terms of rudder trimming - so all the secrets from the first Boat Whisperer DVD's were put into practice. When on a run with the sail out too far - a gust would make it roll to windward, but with a quick bear away and sheet in - she was back on her feet and the acceleration from the manoeuvre was obvious - against the option of spinning out - this was a cool trick. Also gybing at the leeward mark - showed the classic sheeting in too early as the bear away was started meant the boat encountered a leeward heel that countered and slowed the rudder turn taking all the speed off the boat. The Boat Whisperer trick alternative was to turn slightly upwind, ease the sheet slightly before using the rudder to bear away - then start sheeting in as the boat is turning in its outward heel due to the turning force - and the boat would come out of the gybe speedy and trimmed ready for the beat.
All the Downwind and Gybing Secrets on One DVD
The only negative about the radio controlled boats was that I could not get in there with it. I wished I could have sat aft in the big gusts downwind to promote a plane rather than a nose dive - perhaps one day long in the future, there will be a radio controlled boat with ballast that can be moved fore and aft - then I would have to grow and extra hand or become an octopus to race that one effectively.
Gear Guides
Need help finding best kit for you? we got you covered.
Product Support Hub
Videos and instructions to give you tips and tricks.
Garment Care
The right care helps your gear perform at its best and go the distance.
The Blog
Discover tips, tricks and stories from the Rooster team and guest writers.
Revive
Need repairs? Our trusted local partner has you covered.
Custom Clothing
Custom performance clothing for clubs, events, and organisations.
- Choosing a selection results in a full page refresh.
Select Store
EU
US