


 Select Store
 EU
EU
 US
US

I have owned an Aero for 5 years, and in March 2021 decided to take advantage of the Boat Show to buy a new boat. Whilst setting up the new boat, I took a bunch of photos with the idea of documenting ideas on rigging and setup options.
The Aero is perfectly sailable as received from RS – simply follow the Rigging Manual (v6 at the point of writing) and your boat will be good to go. Everything you need to rig the boat is included, no need to buy additional parts, and all rope is helpfully labelled.
There are, however, rigging and set-up tweaks that you may choose to apply to your new (or existing) boat. The RS Aero class rules give some scope for modifications, the rules are updated from time to time so before embarking on any modifications/upgrades, it is worth reading the latest rules document to ensure that any modifications will comply.
As well as some rigging tweaks, I’ve included three boat checks that Aero owners (for new or old boats) may find helpful.
Note that the tweaks in the blog post are for the RS Aero with the 7 rig. Whilst the principles will be fine for the 5 and 9 rig, some of the dimensions will need to be refined.
1. Vang Upgrade: Additional block and tapered vang line
The vang is a principle control in any dinghy, the Aero is no exception. Anything that makes the vang easier to use is to be welcomed. The two modifications outlined here make the vang easier to adjust under load – the block on the gooseneck has less friction than the gooseneck pulley, and the dyneema of the tapered kicker is slippery through the blocks.
Note that some sailors in the front of the fleet don’t bother will these mods and adhere to the rigging manual. I can only assume they have stronger arms than me, maybe a few trips to the gym could be a viable alternative!
What kit is required?
Harken 2698 18mm FLY Carbo T2 Soft-Attach Block - Open Centre
RS Aero Tapered Kicker Control Line
What tools are required?
None.
Description
The class rules state the following:
“It is permitted to attach to the gooseneck a block of no more than 20mm diameter using rope tied around the vang gooseneck block (the attached block being no more 60mm from the gooseneck block) and to lead the vang rope through that attached block rather than the gooseneck block.”
The Harken block is ideal for this, and comes with a length of cord that can be used to secure the block to the gooseneck.
The end result should look like this:

The Rooster tapered kicker comes with a pre-spliced loop, so it is simple to install on the boat – pass the loop through the becket on the harken block on the boom, and then pass the entire line through the loop. As you thread the kicker through the blocks, do be careful to avoid ‘crossover’ of the rope. You should be able to thread the kicker such that there are no ropes rubbing against each other. Once rigged, the tapered kicker looks like this:

Additional Notes
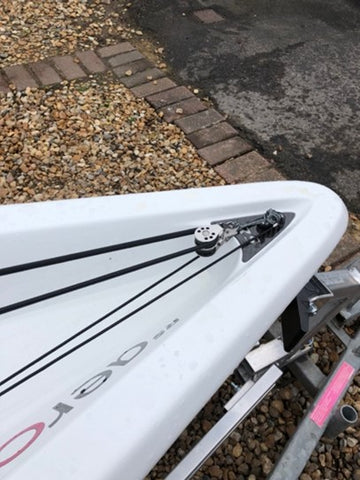
The Aero comes with a dyneema primary vang line, set up of this line is crucial to make sure that you have the maximum available travel on the secondary purchase. In short, when you set up the vang, you need the blocks to be touching, like this:

After you have used the vang in anger you will find that the loops on the mast and booms are bedding in and that the dyneema has stretched, and the primary line will have to be shortened to compensate. I left the vang on max for 20 minutes on my drive and then had to shorten the primary line by 10cm or so (that’s 4” for stateside brethren). Before shortening it looked like this:

You should expect to keep adjusting the primary line as you use the boat, the objective needs to be to keep maximum travel in the vang. I might be tempted to try ‘Rooster Zero’ to keep stretching to a minimum, but have yet to do so.
2. Easier Controls: Downhaul and Outhaul releases
Imagine the following scenario. You are using your new Aero in the Nationals for the first time, picked every shift on the first beat, and rounded the windward mark at the head of the fleet. It is a solid 25 knots, and you have been using max downhaul for the duration of the beat. As you approach the windward mark, you release the downhaul and outhaul, and just before the bear away you release some vang. A little windward heel and glorious bear away, photographers snapping away from a rib, a tear in the eye of the jury boat as they witness flawless execution.
A short way down the run you realise that the downhaul and outhaul are still on more than you would like – releasing the vang has allowed for more scope of release on the downhaul and outhaul. But you are right at the back of the boat, and don’t want to shift weight forward to adjust. In a light spot you decide to nip forward to release the controls further, but alas, a unforeseen gust hits the boat and you spin in a capsize to windward. The fleet sail by, making helpful remarks on capsize recovery (they are all trying not to smile, but inwardly, they are all smiling and looking forward to post- race analysis).
Downhaul and outhaul releases make it easier to release the control lines in a single action, rather than needing multiple passes as other controls are changed. So you can release before the windward mark, and be confident that you will not be readjusting on the next leg of the course. It is a relatively inexpensive upgrade that just makes the boat easier to sail.
What kit is required?
For the downhaul release:
For the outhaul release:
What tools are required?
None, but the following is useful (once you have used a hot knife for cutting rope you are unlikely to go back to a knife and lighter):
Hot knife kit
Also worth learning how to tie knots in shock cord, in particular the Zeppelin Bend
Description
For the downhaul release, you need to thread the spring hook onto the shockcord, and then create a loop of cord attached to the upper downhaul block. The Zeppelin Bend referenced above is a good knot to use to make the loop. You then make a loop in the halyard tail – this is the attachment point for the spring clip. Once installed, the system looks like this:

You can see the halyard loop and spring clip at the top of the picture, next to the ‘7’ on the mast, and loop of shock cord running down the mast to the downhaul double block. If required, you want to adjust the length of the loop such that there is a very slight tension when the downhaul is on maximum release.
The outhaul release is straight forward. Pass the 2m length of shock cord through the clew, and attach an Inglefield clip to each end using a simple stop knot. The shock cord gets taken either side of the boom mainsheet blocks to the first of the vang loops on the boom, and the Inglefield clips connected (on the right in the picture below).

Additional notes
There are many different ways to facilitate the release of downhaul and outhaul, this is just one example. I’ve used this set up for a couple of years with no issues, but have seen more elaborate systems on other boats.
I did try using 8mm shock cord for the downhaul release, but found that this made the downhaul too difficult to pull on – 6mm appears to the be good balance.
Minor point, if you make up your own system, be careful not to use a metal clip where it can abrade the carbon spars.
3. Easier Controls: Replacement of Downhaul double block
The aero comes rigged with a double block attached to the deck, to be used as the lower block in the downhaul cascade. The Aero Class Rules (specifically C.6.1.3(v)) allow for this block to be replaced by two single blocks.
The use of single blocks in the cascade reduces friction, and so makes the control easier to use. Worth noting that wear on the blocks is reduced as well.
What Kit is Required?
2x Harken 2698 18mm FLY Carbo T2 Soft-Attach Block - Open Centre
What tools are required?
None, but a needle fid can make it easier to fit the blocks
Description
This picture shows the double block to be replaced (centre), and the two singles to be installed (left).

The picture below shows the two single blocks installed. I’ve used some Rooster Zero (UHMPE/Spectra) to attach the blocks to the deck, but there is no reason not to use the cord that comes with the blocks (I did this to match the Dyneema of the other blocks, a completely unnecessary attention to detail that must have cost £’000s over the years!).

4. Easier controls – Easysplice for the downhaul and outhaul
The standard RS rigging pack comes with downhaul and outhaul lines that are already cut to length, each line has a small loop at both ends. Once the lines are threaded through the blocks, they are connected using a ‘lashing’ (see pages 19 and 15 in the rigging manual). Whilst I have no doubt that RS have tested the arrangement to the extreme, I personally prefer a splice to join the tails of the control lines, I find it runs through the small diameter blocks very easily, and I can never quite trust the ‘lashing’ approach!
Again, some sailors will be fine with the standard approach, but I note that a lot of sailors prefer the spliced rope solution.
What Kit is Required?
For the downhaul secondary control line: 8m of blue/white EasySplice
For the outhaul secondary control line: 5.5m of black/white EasySplice
What tools are required?
Splicing tools are required. You could do worse than buy the full kit, makes this type of job very easy.
Description
Follow the rigging manual, but instead of lashing the ends of the control lines, use a splice. For instructions already available on the Rooster blog
Other Small Stuff
5. ‘Main halyard primary’ upgrade
The Aero primary halyard is attached to the tail using a double sheet bend. This arrangement can be frustrating as the knot can catch in the eye at the top of the mast, making the sail more difficult to hoist and drop.

An easy solution is to make a primary halyard using EasySplice, with a loop that is attached to the tail using a bowline. This does not catch in the eye at the top of the mast, and makes hoisting and dropping just a little bit easier. You can buy one off the shelf from Rooster, including the plastic bobble.

6. Mainsheet upgrade
The standard mainsheet that comes with the Aero is 8mm Kingfisher ‘Braid on Braid’. It is a rope that is ‘soft’ and easy on the hands. The class rules allow for a mainsheet from any manufacturer, with a minimum diameter of 6mm and a maximum of 9mm.
A couple of seasons back, I tried a 6mm Polilite mainsheet for light winds, on the basis that there would be less friction through the blocks, and Polilite does not seem to form knots whilst lying in the bottom of the boat. After a few months trial, I now use 6mm Polilite as a mainsheet in all wind strengths – I do not have problems with sheet loading despite the relatively small diameter.
If a 6mm mainsheet seems a bit too small, there is a 7mm option that is already cut to size and even 8mm if you are happy to purchase by the meter. .
10m of 6mm Polilite mainsheet
10m of 7mm Polilite mainsheet:
7. JC Strap
A JC Strap helps the boom move to outward from the boat, especially useful when bearing away from close hauled to a run in light winds. It can interfere with the release of the downhaul, but not so much of a problem if you have an elastic downhaul release. Many classes use a JC strap, they just make the boat a little easier to sail.


My JC Strap is threaded through one of the vang loops on the boom, to a block attached to the eye on the bow of the boat (there is a double block in the photo as I subsequently moved the downhaul elastic to this block, a single block for the JC Strap is equally as good). I used 6mm shock cord which seems fine, and is the recommended diameter in the rigging manual. Remember to rig it outside the downhaull!
Parts required:
1x block of choice: HARKEN 224 22MM SINGLE MICRO BLOCK, or HARKEN 226 22MM DOUBLE MICRO BLOCK if you want the downhaul elastic and JC Strap in one block!
8. Deck Protection
Metal blocks seem to stain gelcoat – not sure why this happens, but it can make for an unsightly deck (which is triggering to those perfectionists among us). I’m not sure whether the blocks can actual damage the gelcoat, as I’ve always protected the deck. Easiest way to prevent the staining/damage is to use protective tape, cut to make appropriately sized patches. The photo shows tape below the blocks of the downhaul.

Parts required:
2m of clear chafe tape
9. Tape the Tiller Extension to the Tiller
This only takes a moment to do, but saves enormous embarrassment when the tiller extension decides to part from the tiller mid- race.

And finally, some checks for those fortunate enough to be buying a new Aero:
10. Check the fit between mast sections
The top and bottom mast should slot together with no gap between the sections. On my new boat, the sections were separated by about 2.5mm – no great distance, but this allows the sections to rotate, resulting in a potentially misaligned mast track.
The issue was the mast track on the bottom section – it was slightly overlapping the join. A couple of minutes with a file and the mast track was aligned to join, and the sections slotted together with no gap. So if you do have a gap have a close look at the mast track.
11. Check the screws on the hull fittings
There are a number of hull fittings attach to the deck using stainless screws. I checked all screws, the majority were fine, but three required tightening. I’m not sure that any of these would ultimately have caused an issue, but for the amount of time it takes, a systematic check seems like a good idea.
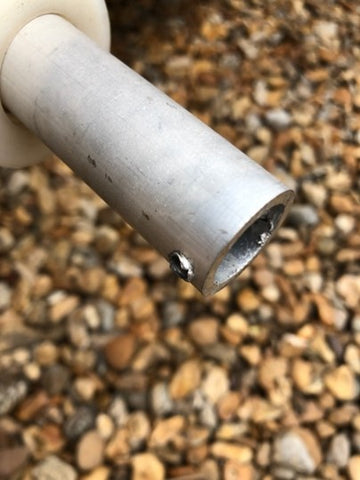
12. Check for burrs on the trolley axles
Very small point, but worth checking the holes for the lynchpins on the trolley. Mine had burrs that (i) prevented my trolley wheels from being removed, and (ii) but my finger! A few moments with a file sorts it out (but you would think the person drilling the hole could at least deburr it, and perhaps use a jig to get the holes aligned to the centre of the axle).