Kit Guides
Avoiding Common Kit Mistakes
Kit Guide
Protecting Your Assets - a Buyer's Guide for Spar and Foil Bags
Blog entry by Steve Cockerill
Putting your spars and foils into a cosy bag feels like the right thing to do. But if you are not careful, what appears to be a caring thing, might also be the worst thing. After sailing on salt water, we should wash our spars down with fresh water and where possible allow them to dry out. I tend to bag mine for safe keeping in transit. However, many bags use non-breathable fabrics and foams in their construction which trap any residual moisture. Moisture encourages dissimilar metal corrosion where stainless or Monel rivets react with the aluminium of the mast. The fizzing is proof of the corrosion taking place. What you need is a spar bag that breathes.Foils packed away in a non-breathable foil bag will sweat rather than dry out, causing Osmosis.
Ideally, you should dry off your foils before packing them away. Again salt water is a hindrance as it attracts moisture so a quick wash helps to remove the salt and gives it a chance to dry out. Look for foil bags that breathe.
What to Look For
Open cell foams with a breathable membrane is the safest option for both Spars and Foils. Spars and foils dry out naturally if they are packed damp which prevents dissimilar metal corrosion and osmosis. In my experience, many manufacturers are keen to save money on material cost which ends up costing you more in replacement spars and repairs to foils.
Below are some of the bags we make to protect your gear:
Padded Spar Bag 3650mm by 165mm (Laser Top Mast, Aero Top Mast and 9 Lower Mast, Lightening Upper and Lower mast)
Padded Spar Bag 2950mm by 165mm (Laser Boom and Standard Lower Master, Topper Upper, Lower Mast and Boom, Aero 7 Lower Mast, Aero Boom, Optimist Lower Mast and Lightening Boom)
Padded Spar Bag 2350mm by 165mm
Optimist Foil Bag
Foil Bag for the Laser/ILCA - also fits the Europe
4000 Rudder Bag
4000 Daggerboard Bag
Solo Rudder Bag
Solo Mast Bag
Europe Travel Mast Bag
Europe Boom Bag
"Pocket-Rocket" Set Up Tricks: RS Aerocup
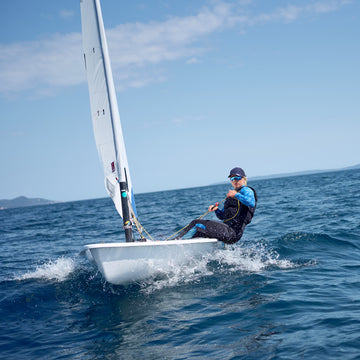
After unknowingly being given the nickname ‘Pocket-Rocket’, published on both the main event web page and in Yachts and Yachting, which I only found out about the day before the event, I now had to live up to the prestigious title and Malcesine, Garda was the perfect place to do so.
The first day of racing was forecast for light winds with a 1300hr start, which was spot on. There was about 5-9knots on the race course from the south with about 20 degrees of heat – perfect! I went out, not sure what the day would bring, but was pretty relaxed either way as the back drop of the mountains was enough to make it a good day to be on the water. In no time at all, the first race was underway and I surprised myself with a 1st place with a considerable lead. Two more bullets in the next two races left me coming off the water in a good place. I think that reading Sam Whaley’s recent blog after the UK nationals on sailing in light winds helped my upwind speed considerably, where I applied the following:
Minimal kicker. Only take up a bit of the slack when the main sheet is pulled in (end of boom in line with aft outer corner). As the wind slightly increased, the kicker can be tweaked an inch or two to compensate
Cunningham and outhaul relatively loose
Play the mainsheet as the main setting – let out in lighter patches, and pull in a bit in the gusts to promote an extra squeeze in height
Point 5-10 degrees lower to increase VMG
Taking this into the second day, I fired out another 1st place in the first race. With the second race came more wind seeing gusts of approx 14/15knots, where I found myself having to considerably de-power, being the smallest in the fleet - "Pocket" sized.
With this increased wind, the last race was to go either way. Luckily the wind decreased and shifted back to the right on the first beat (as it did when the wind decreased on the previous day), where I spotted it early and sneakily tacked on the incoming shift, coming in to the windward mark with a considerable lead on the rest of the fleet, who over stood the layline. Throughout the rest of the race, I was able to extend my lead to finish over a leg ahead of the rest of the fleet. I had to live up to the ‘Pocket Rocket’ name somehow!
Going into the third day with all race wins, it was then a challenge (set in the bar) to try to finish the regatta with a straight set of wins, which I knew would be difficult in the stronger forecast morning winds. The first race was at 8.30am!! Once on the water, I was ready for a day of max hiking and max de-powering to maintain my position. The fight was definitely more difficult with much closer racing, only getting one race by half a boat length on the finish line, but I managed to achieve my goal – somehow!! Walking was a bit of a challenge when I came off the water! What made me quick for a lightweight was:
Cunningham – pull on as hard as possible
Kicker – pull on as hard as possible, this helps the sail to spill air out the top of the leach when the mainsheet is let out. It’s amazing how much effect pulling on the cunningham and kicker has on the top leach area of the sail if you look up
Outhaul – still relatively loose to power through the waves. Because I had de-powered the sail so much everywhere else, I needed some shape to it in order to move.
Play the mainsheet a lot to keep the boat flat/constant heel
Hike until your quads feel like they might potentially tear!
So my first win in the Aero is complete in true Pocket Rocket form! Makes a difference to my usual style of losing it on the last day/race. Also, no OCS’s or black flags - another personal record!
The event was organised brilliantly at Fraglia Vela Malcesine, and Peter Barton, once again, didn’t fail to disappoint with his enthusiasm and hard work throughout the event. It also wouldn’t be the same without the great bunch of sailors both on and off the water. Got to thank my dad for driving all the way with my boat as well - cheers Dad!
Looking forward to the next one!
Kate Sargent
RS Aero Over Deck Rigging
POST VIDEO NOTE: Please use a separate piece of short grey line in the Rooster kit to attach the two blocks to the traveller eye. see image below: This is to stop any chance of the two blocks and their 3mm elastic from tensioning the traveller in any way. This was required by measurement at the 2018 World Championships.
The story:
During the recent RS Aero World Championships, it became apparent that if I wanted to release the controls downwind efficiently that I would need to change the control lines to over deck take up style. The old style tended to get a little tangled downwind:
I was inspired by Steve Norbury's version that I had seen at the Aero Southern Championships which I knew was class legal. Obviously, I have put some of my splicing experience into the kit to fasten the two Ronstan Shock Blocks in place and used Rooster's EasySplice™ Continuous Control Line as it's just so easy! I used the Ronstan Shock Blocks as they can be colour co-ordinated and are very light - which I guess is nice as the boat is so nice and light. I also used Selden 30mm Loop Top Blocks for the take ups. They are also lighter and more than man enough for the job.
Rooster has produced a kit with most of the splicing done, all you will have to do is 'cow splice' the Ronstan Shock Blocks onto a pre-made double loop 180mm line under the deck. But if you are feeling brave, take a look at the related Rooster Videos on Splicing (Reverse Brummell Hitch, Spectwelve and Rooster EasySplice™ Continuous Control Line). We suggest you use 2mm Spectwelve (an SK78 12 braided Dynema) for the take-up tidies and Rooster 4mm Spectwelve (an SK78 12 braided Dynema) for the traveller. You will also notice that I have adopted the Rooster colours which have been used extensively in singlehanded sailing with blue for downhaul/ Cunningham, grey for outhaul and red for kicker or vang. Feel free to take the parts and ropes in the colours you are used to.
I used 5m of EasySplice™ for the outhaul system, although I did not have much line to spare so perhaps it's worth taking 6m and losing a bit. Our kit is now 5.5m so you will need to first ensure your outhaul is maximum off.
Then join the outhaul when it can just go in front of the centreboard case with a little movement.
For the downhaul, I used 8m of EasySplice™, plus 1m of 2mm Spectwelve for the two side deck tidy's and 1m of 4mm Spectwelve for the traveller.
Tools: I like my tools so I tend to try and use them all. But if you are keen to do the whole thing yourself then you will need:
Serrated Scissors
2/3mm Pull Fid
4mm Push fid
Rooster EasySplice™ Needle Fid (I use the super thin needle for the EasySplice™ Control Line splice).
Needles and Waxed Whipping Twine (available on the Rooster website to finish off the joins in the control line.)
If you purchase the kit, then you will only need the EasySplice™ Needle Fid, twine and needle, although I am sure you would still find the Serrated Scissors useful.
Splicing Tip When you cut the centre core out of easy splice, leave it as loose as possible. This will enable the other line to pass into it easier. Do not try and milk it to make it smaller as this will make it harder to pull the other end through it.
RS Sailing is the most forward-looking company I have ever been close to. I understand that they will be stocking these 'Rooster' upgrade kits in due course. I think it will make a significant difference to your Aero sailing enjoyment - if it could get any better!
Save Save
Aero Main Halyard Tips
Here is a neat little trick to make your Aero Halyard work a little more smoothly.
Take 1m of Rooster Easysplice and take 600mm of the inner core, but remember to tie a knot in the other end to ensure you keep the inner core where the rope stopper is. It will be hard to take out the 600mm - but give it your best shot. Then you can make a Brummel hitch loop in the easy splice (you will have to unknot the other end to pass it back through the tail. ). Examples of a Brummel hitch video can be found here. I folded the 600mm of uncored rope in half and made a 40mm long loop, ensuring the tail went back into the line over the maximum distance to fill the space that the inner core left. This gives the Easysplice the right thickness to jamb in your cleat. To ensure the boggle does not fall off the other end, you might like to back splice some of the EasySplice into the end (make it thicker). Check and adjust the length of your new EasySplice halyard to ensure the double thickness easy splice sits neatly on the cleat area. I keep using the stretchy 2mm polyester line as my pull up or uncleat line because its stretch allows the mast bend to vary lots with vang tension, ensuring that it will not pull the halyard out of the mast cleat. If you have lost the original - you can use this replacement (approx. 11m length is required) 2mm Polyester Halyard Line, sold per m.
Gear Guides
Need help finding best kit for you? we got you covered.
Product Support Hub
Videos and instructions to give you tips and tricks.
Garment Care
The right care helps your gear perform at its best and go the distance.
The Blog
Discover tips, tricks and stories from the Rooster team and guest writers.
Revive
Need repairs? Our trusted local partner has you covered.
Custom Clothing
Custom performance clothing for clubs, events, and organisations.
- Choosing a selection results in a full page refresh.
Select Store
EU
US