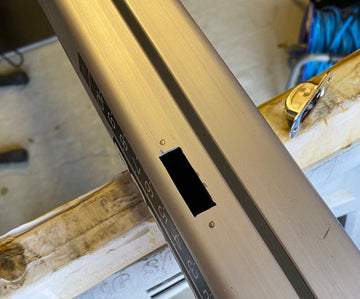
This a short article on how to cut a neat slot in your alloy mast or boom to fit a typical sheave box. This example is fitting a small 15mm diameter sheave block (from Ronstan) into a boom for the adjustment of the outboard end of a mainsail flattener.

|
 |
Tools required:
Pencil.
Masking tape.
Ruler.
Vernier Callipers. (Optional)

Hand/Electric drill and bits.
A center punch.
A small metal file. (Flat or triangular).
A 'Dremel' tool and cutting disc attachment. (Optional)

|
Self tapping screws or pop rivets to fix the sheave box.
Duralac Anti Corrosive Compound.
A typical Sheave box e.g a..- RONSTAN RF15711.
or the Spinnaker 4mm sheave box from Super Spar PN 409
Procedure
First make sure you choose the correct fitting for the job, based on the control rope size, and expected load that will be used on the fitting - and the position of the fitting in the spar. As you will be cutting a slot in the spar, you need to keep the slot/hole to a minimum and locate the new fitting away from areas of possible high stress areas such as spreader brackets, gooseneck areas, kicker and mainsheet take off points for booms and the like. For a typical dinghy mast the front of the mast is normally one the strongest sections of the mast, especially in the alloy tapered section, where it will be welded, as this area will be thicker. For booms, the top and bottoms of the section are the strongest areas.
Measure carefully the cut-out dimension for the sheave box. Manufactures dimensions can be used - but have been known to the incorrect, so use a pair of Vernier callipers to measure the actual fitting. You could even make a small cardboard template first to test fit your new sheave box. In this case the dimensions are 28 x 9.5mm for the RONSTAN RF15711 sheave box.
Using masking tape affix this to the area where you wish to cut the slot, and mark with a pencil and with a small Engineering ruler and square, mark out the area to be cut out. Measure and recheck before any drilling or cutting….
Using a 4mm drill bit (depends of the fitting slot cut out size width), now carefully drill 4no.holes inside the measured-out rectangle. Use the metal centre punch to tap a light mark, so the drill bit does not wander when you start to drill the 4mm holes.
Now, if you have a Dremel tool you can cut down the sides to join up the 4 holes to remove the bulk of the metal. If you do not have this tool, then simply drill more holes down each side and then file down to create a neat rectangle slot.

Remove the masking tape, and now test fit the sheave fitting and mark the position for the affixing holes.

Now drill the holes for the screws or rivets. For self tapping screws you will need to drill the correct size hole by selecting the correct drill bit size for your self-tapper screws and then let the s/s self tapper cut a thread into the alloy material to tighten correctly.
Apply a smear of Duralac Anti Corrosive Compound to the base of the s/s sheave, the edges of the new slot, and the screws or rivets you are using.
Now screw in the self-tappers (or pop rivets with a suitable gun) to fix the sheave into the slot.
(Note : Just before you fix in the sheave box, you might wish to feed in the rope or line before final fix - or feed in a 'mouse' line...)
A guide to select the correct drill to match the gauge/number of self-tapping screw
| Self Tapping Screw Size | Sheet Thickness (mm) | Guide Pilot Hole Size (mm)* |
| No. 4 (2.9mm) | 0.45 | 2.21 |
| 0.91 | 2.31 | |
| No. 6 (3.5mm) | 0.45 | 2.70 |
| 0.91 | 2.80 | |
| No. 8 (4.2mm) | 0.71 | 3.00 |
| 0.91 | 3.08 | |
| 1.22 | 3.20 | |
| 1.62 | 3.40 | |
| No. 10 (4.8mm) | 0.71 | 3.51 |
| 0.91 | 3.59 | |
| 1.22 | 3.71 | |
| 1.62 | 3.81 |
When using self-tapping screws, the chart above shows the suggested drill size that you should use to drill the pilot hole. As you can see, it is not an exact science, there is a range for each screw size.
Broadly speaking, the thicker the material that you are drilling, the more you should move towards the top end of the range when selecting the drill size.
So, all you need do now is feed through your rope or halyard line and go sailing.....!

A typical valley cleat fitting, using 2 no. Pozidrive self-tapping screws (no.10) to attach. Pilot hole used was a 3.5mm drill.


 Select Store
 EU
EU
 US
US
