


Kit Guide
Maintain and Repair your Topper Bailer


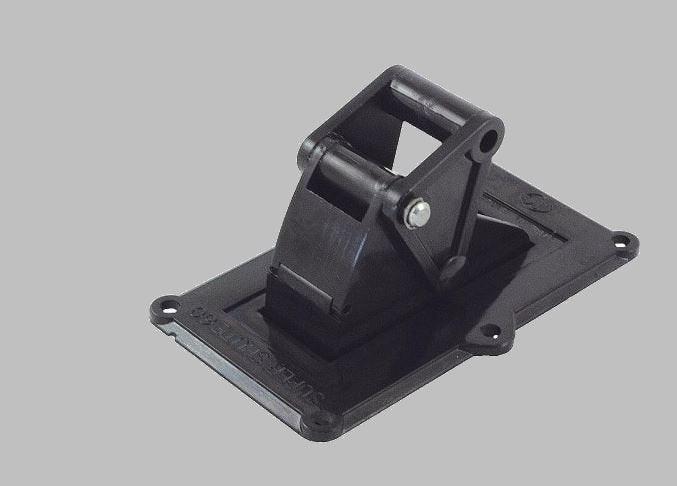
BAILERS – Maintain and Repair, prior to you first event! The Super Shute 60 bailer (pic 1) is expensive and is easily damaged through misuse and accident. We are always trying to find ways to keep your costs down so here goes: MAINTAIN
- It only takes a moments carelessness to cause terminal damage to the bailer as the boat is slide off the trolley. How many of us have had to replace a bailer as the rest of the fleet heads off towards the start line? Just the kind of stress we don’t need!
- Rinse the bailer out after sailing to get rid of any grit.
- Lubricate regularly to keep the rubber soft and slippery. That way the shute will go up and down without force – we don’t want the handle coming off in our hands in the middle of the race because we had to pull too hard! DON’T USE DRYLUBE – it makes the plastic very brittle. The one in picture 2 is available at DIY stores for putting waste pipes together.
- Be aware that cold weather makes plastic more brittle and needs more careful handling
Incidentally you must use the original (or equivalent) nuts and bolts to stay class legal.
The Topper class uses Y10 bolts to stay class legal. These are pan head bolts. see : Topper Y10 Gudgeon Plate/Bailer/Centre Main Screw - Single - A4 Stainl – ROOSTER UK (roostersailing.com)
Rooster Sailing stock a number of the parts that break (shute, gasket, handle and flap – see pics 3 &4) and it is always cheaper to repair rather than replace. The following can be done with the bailer still in the boat but it is so much easier with it out:
- Unscrew the plate from the bottom of the bailer (pic 6) – they are small fiddly brass screws I’m afraid.
- Un-clip the little circlip from one end of the stainless handle pivot with a small screwdriver – careful they spring everywhere!
- Drive out the pivot with a suitable punch which is best done in a vice (pic 5). If the handle falls off in a race, hold on to it because we cannot source the pivot.
- The shute will now come out through the bottom and can be replaced with the new one. Be careful which way round it goes – there is a hollow in the rubber seal (pic 7) that accepts the small piece of plastic on the thin end of the shute that acts as a hinge.
- The flap (pic 8) should be fitted to the shute prior to fitting and it is possible to re-use your old one. The flap pivots on two tiny lugs that come out of each side. They are so small and flexible that you can bend them backwards and forwards a number of times before they break. The old one can be pulled off (just go for it) and the lugs straightened out. I put one of the lugs into the appropriate hole on the shute and pull the flap into place. That way you hope the other lug will seat in the other hole on the shute. Wriggle (a technical term) the flap around until it moves freely. Replacements are cheap so you can afford to take a risk.
- The pivot has to be driven out because the hole through the plastic tube is tight and it doesn’t need to be. While it’s out why not drill the centre out so it’s an easy fit?
- Reassemble the handle again taking care of flying circlips.
- Then of course the plate gets screwed back on and the bailer fitted to the boat. Having a ready repaired bailer as a spare is probably a good idea so you can rotate between the two if and when they get broken.
- If the handle comes off (hold on to it remember) and the shute falls out then there will be a large hole in the bottom of your boat (fortunately Toppers do not sink but carrying a small swimming pools worth of water around with you is not fast). You could do with plugging it. I made a simple device (pic 9) out of two bits of plastic and a piece of elasticated rope. It’s a bit hard to see but you fit the lower end through the hull from the inside and twist it sideways. The top piece slides down the bungy which is cleated off in a ‘V’ I cut out of one side of the hole (a knot in the cord holds it in the ‘V’.
- If the hinge breaks off then use a small length of rope to tie the handle off to the side toestrap.
The Super Shute box instructions can also be found HERE
Leave a comment